Blizzard’s latest Overwatch title has made headlines, sometimes for the wrong reasons. Server queues have plagued the game, clogging up players’ time and the game as a whole. Similar to the first Overwatch, players occasionally connect to the wrong servers, preventing them from communicating with their teamates and making it much more difficult for a squad to function cohesively. To change servers in Overwatch 2, simply follow these steps.
- Is Overwatch 2 outages today ? How to fix Overwatch 2 LC-208 disconnected from game server error
- How many heroes are available & How to Unlock Characters in Overwatch 2
Overwatch 2 – How To Change Servers ?
Fortunately, there is a simple solution. All you have to do is go to the Battle.net client and change your region to somewhere closer, or from one area to another.
This will help you get into servers faster; however, Overwatch 2 has had a few server issues, so you may still encounter problems after completing these steps :
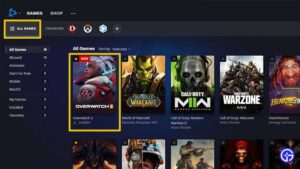
- On your computer, start the Battle.net Client.
- At the top, select All Games => select Overwatch 2.
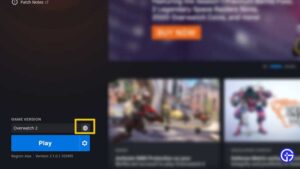
- A blue PLAY button can be found in the bottom left corner.
- Select Overwatch 2 by clicking on the globe icon next to it.
- The continents of the Americas, Asia, and Europe will be visible.
- Choose the server that may have a lower server load based on the peak times and click PLAY
Overwatch 2: How to Activate Account Merger
On Console
To merge your accounts, first launch Overwatch 2 on your console. This will start the initial setup process, which includes video and audio configuration options.
After that, the game will prompt you to either scan a QR code with your phone or enter a simple alphanumeric code through a URL provided on the screen. Either of these actions will take you to your Battle.net account page. Log in to your existing account, and then enter the code or scan the QR code to link the game to your account.
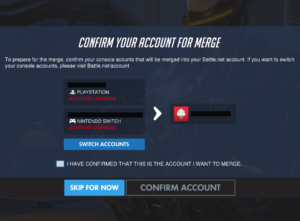 After that, simply confirm that you want to link your console to your Battle.net account, and you’re done. The merger is complete.
On PC
On PC, go to the Battle.net account page and either sign in with your existing account or create a new one before merging accounts. When you do this, your browser will open a new tab with all the accounts you can link to your Battle.net account. Click the “Connections” button.
Choose your preferred platform and click the “+ Connect” button next to it. The website will automatically retrieve your account, so all you have to do is click “Continue” to finish. Your console account has now been combined with Blizzard’s Battle.net account.
Please keep in mind that both merger methods have one major drawback. If you merge one console account with your Battle.net information and want to link another one instead, you must wait a full year. That is obviously a significant disadvantage.
How to Fix the “Merge Accounts Not Working” Error
Many Overwatch 2 players have reported receiving the dreaded “Merge Accounts Not Working” message whenever they attempt to merge or use merged accounts. Unfortunately, this could be one of those Overwatch 2 errors over which you have little control.
At the very least, make certain that the basic account merger process is followed correctly. If you try to do something like merge multiple accounts onto one platform, you’ll get an error message. This will also happen if you have disrupted the basic merger process in any way.
If you’re certain you’re doing everything correctly, the issue isn’t likely to be on your end. This error appears to be related to the larger server issues that Overwatch 2 is currently experiencing, and there isn’t much you can do about it at the moment. You can try restarting your game, or you can choose to play without merged accounts until Blizzard confirms the account merger situation has been resolved completely. Neither option is ideal, but they are the only ones available to you at this time.